Background 1

Tuesday, September 7, 2010

Cakes for a Cause

As promised: cakes!

My original plan was to make a cake for Zach to take to school at the end of his first week, but about mid-week he got a cake request from one of the girls on the volleyball team.

The girls were concerned about their coach and her son, both of whom are having some health problems. The girls wanted to have a spur-of-the-moment bake sale to raise money for incidental costs incurred while their coach's son has to be in the hospital in a few weeks.

I have to say that I'm really impressed with the caliber of students at Zach's school. Most of them are thoughtful, responsible, bright kids who do their best and are considerate of others. No one asked the volleyball team to have a bake sale; they just came up with the idea on their own. So, needless to say, I was happy to make a cake for them.

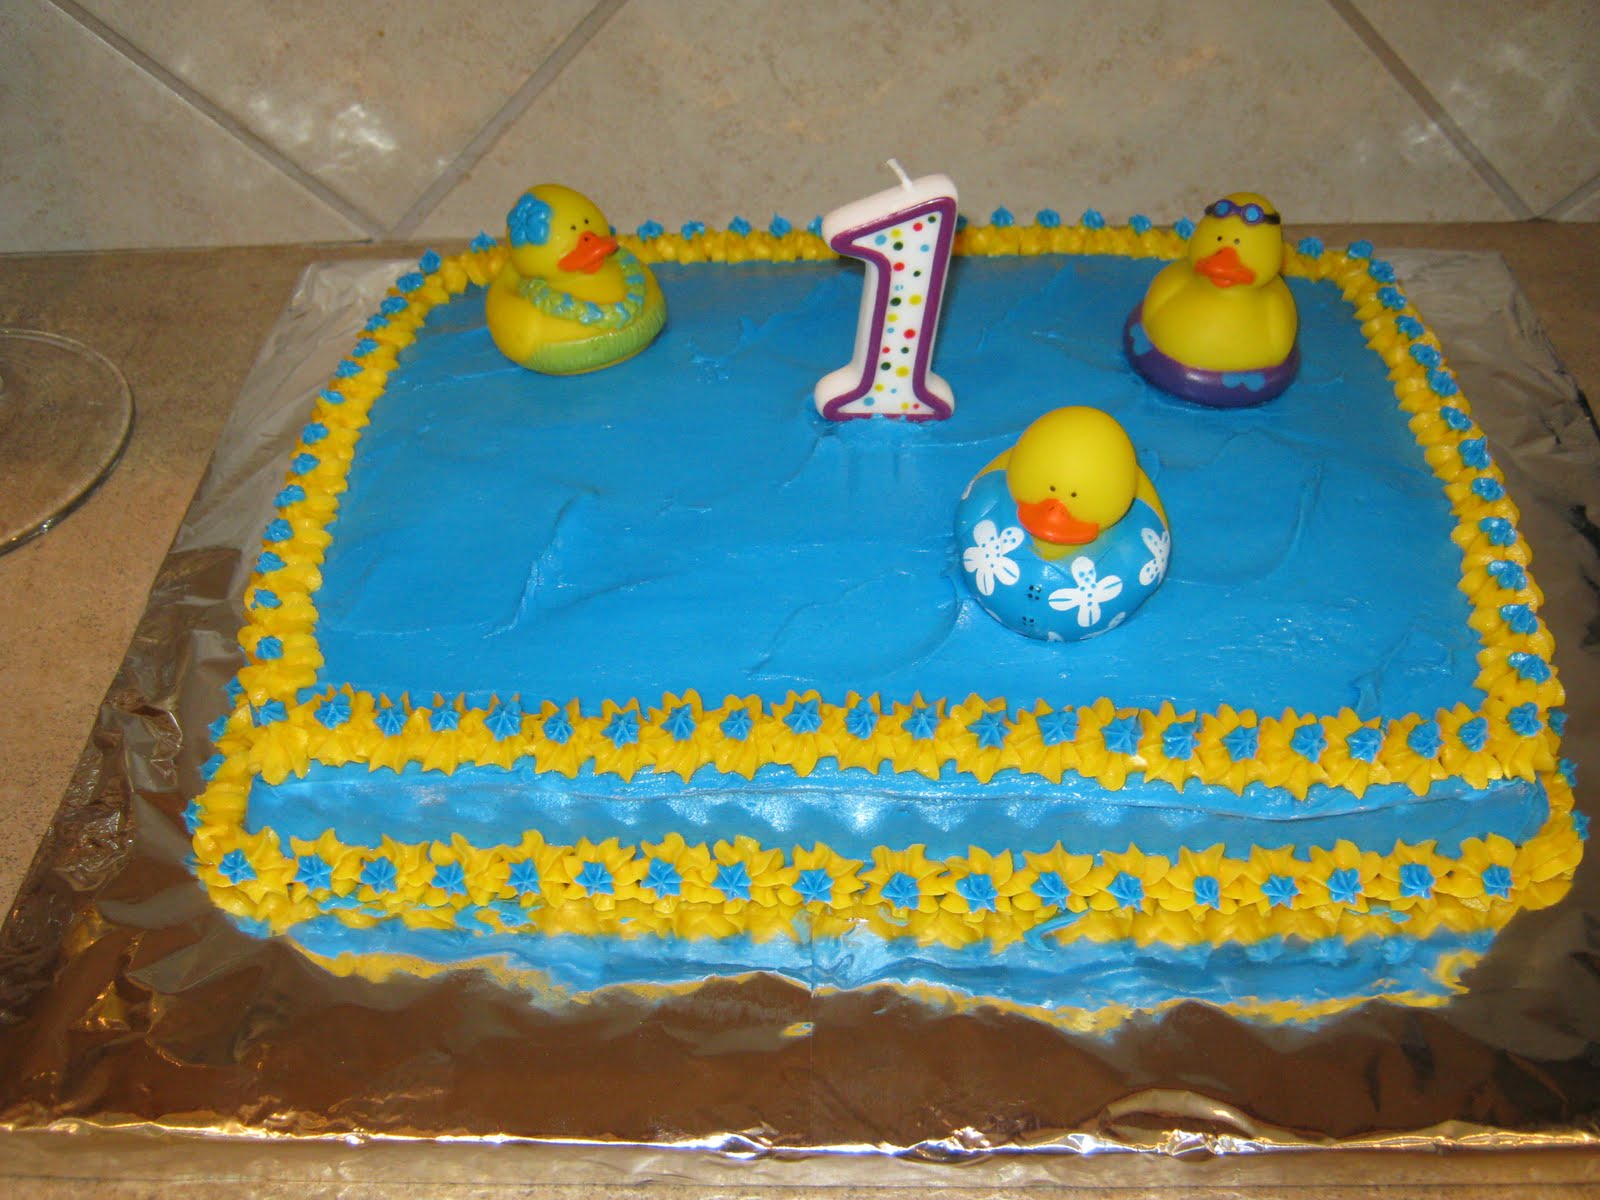
The kids actually requested that I make two one-layer cakes so that maybe they could get a bit more money out of the deal. The design, flavor, and shape were all up to me, so I decided to do one square and one round. I've been wanting to experiment with square cakes, so this gave me the opportunity to work with the square pan I have. Due to short notice and square cake board shortage, I elected to make the second cake round.

Usually I approach a cake with a serious plan that includes sketches and notes on color. But this time I was wide open, even as I mixed the frosting colors. I decided to use this opportunity to work on my flowers and leaves, since I was guessing a "pretty" cake might sell well at a bake sale.

As you might guess, cake decorating is messy business. It's probably the one reason (besides calorie/fat content) that I don't make more cakes. Here is how my counter looks in the midst of decorating:


Keep in mind that the frosting is made of Crisco, butter, cream cheese, and a variety of potent food colorings. I was warned during cake class to avoid putting butter cream down the sink, as it clogs pipes even quicker than it does arteries. So I generally wipe it up as best I can with paper towel, and then wash everything.

My kids, however, wish I would make a cake every week, because then they could do this:


Even though we've turned the calendar to September, we're still sitting around the 90s most of the time in Texas. And just like in May, Zach and I are still steadfast in keeping the thermostat at 80 degrees. And guess what? That's still a bit warm for butter cream icing. Luckily I managed to avoid the same fate as my strawberry catastrophe...

As I dressed up my round cake with little purple flowers, it became apparent that my frosting was too warm to form really nice flowers. But by the time I got the white centers and leaves put on, I was okay with how the flowers looked. And in the meantime, I threw my blue icing into the fridge in preparation for the next cake.


Making flowers is really fun, and so I thought I'd go a bit further with the square cake and make a vine of sorts that flowed all over the cake. These flowers turned out better thanks to the icing's stint in the fridge.


The bake sale was a big success. They earned just over $600 in one evening, and my cakes sold for $40 and $50, respectively. Not bad for a few hours of work!

Monday, August 16, 2010

The Next One Will Be About a Cake

This site is called "Split Chestnut Cakes," right? Perhaps I should have called it "Split Chestnut Crafts and Random Home Projects," since that's what I've been doing lately. I do have plans to make a cake next week in honor of the first week of school, so then we will be back to our regularly scheduled cake blogging.

A few weeks ago in a fit of furniture rearranging, I decided to remove the old headboard off Kate's bed. And when I say old, I mean old. I believe it came from Zach's grandparents. While we still use the nightstand and dresser that match the headboard in Drew's room, I decided that the headboard didn't work in Kate's room next to the "new" nightstand I had just rehabbed and painted for Kate's room. By "new," I mean old. It came from Zach's Granny's garage, and she told me it was one of a set that came from her in-law's home. Are you sensing a theme here? I accept furniture from anywhere.

So without a headboard, I thought the bed looked a little bare. But since Granny didn't have any headboards in her garage, I started looking for some alternatives. The internet showed me all kinds of things I could do...shelves, doors, shudders. I landed on an idea from Better Homes and Gardens where you mount a piece of wood with hooks on the bottom, and on the hooks hang a long pillow that spans the width of the bed.


It is a really cool idea, and I even got some pillow forms from my Mom, but I had a couple problems: 1) I'm not confident in my textile selection skills. And with a plaid bedspread, I was going to have a hard time picking a fabric. 2) I can't sew. I had thoughts of an elaborate tape or iron-on situation (staples, perhaps?), but the fact is that this pillow would need to be pretty sturdy, and tape and safety pins probably wouldn't do the job.

Um, Mom? Duct-taped pillows aren't pretty.

So last weekend Kate and I visited Lowe's to see what kind of pre-made wooden molding they had. As we wandered through the aisles, I found some wooden rosettes used to dress up the corners of doors and windows. We plopped down on the floor and started laying out several pieces to see if I could fashion some kind of installation art.


So I chose to buy eight rosettes with the intent of painting them white, pink, and green. Thankfully our attic is a library of used paint cans that reads like a retrospective of our painting projects through the years. Anytime I get a wild painting hair I head up to the attic and pull down the colors that match the current color of the room I'm working on.

At first I thought the outer circle should be green and the center circle pink, but I was afraid that might too closely resemble a nipple, so I reversed the colors. Here is how they turned out:


At this point I wasn't sure how the rosettes would be arranged on the wall, and even thought I might have to enlist some help to do a crown molding "outline" above the bead and arrange the rosettes inside. But after some sketching I decided to just use the rosettes. Here is how it turned out:

After living with the design for a few days, I think I like it. It's one of those things where I wasn't sure about it at first, and I still think something might be missing. But I don't think a molding outline will do the trick. As with any home decorating mission I undertake, I reserve full rights to rip the whole thing out and start from scratch. Maybe I'll come across some fabric that would work and I'll attempt the pillow headboard!

Monday, August 9, 2010

Paintings: A Year in the Making

We have lived in our house for just over three years now, and for quite awhile I have pondered what to hang over our bed in the master bedroom. I've perused artwork from all the big box stores, Crate and Barrel and Pottery Barn catalogs, etc. While I like some of it, I always come away with the feeling that I could create something just as cool for less money and with a little more...heart. (Not literally hearts. That would be tacky. I just mean it comes from the heart because I made it myself.)

Anyway, I started cutting out pictures of things I like and looking at websites for inspiration. A few of my clippings survived about a year in our junk drawer. Every time I went looking for a rubber band I'd see the photos and think, "I really should get back to thinking about those paintings," and then I'd slam it shut and go about my business. So, when the time was finally right, I came up with the idea to buy three rectangle canvases, paint them three different colors, and then paint the same stenciled vine pattern on each canvas.

I started with the stencil. Foolishly, I thought I might be able to pick up a cool stencil from Lowe's or Hobby Lobby, but that didn't pan out. Instead, I had to buy special stencil paper so that I could fashion my own.

My first stop was, of course, the Internet. I printed some vine designs off a random website with the intention of copying it exactly. But when time came to transfer the stencil to the special paper, it was clear it wouldn't be so cut-and-dry. (Or cut-and-cut, since I was dealing with stencils.) Since I was going for a long rectangle, I couldn't make the stencils fit. I started sketching some things that I thought might work, and when I found one I liked I put it onto the stencil paper. Here is how the stencil looked:


I put the stencil away for several weeks while I dealt with the next step in the process, which was painting the canvases. I chose green, yellow, and rust to match the color scheme in our bedroom. I had one misfire on the green color - I added too much yellow the first time and had to wait for it to dry and re-paint it with just a green and white paint mixture. It turned out much better the second time.


Here my story takes a detour, as I tell you about how it has been 105 degrees for about 10 days in Texas. Last Friday was just like any other scorching day, and I figured there was about a snowball's chance in Texas of getting any sort of rain. So it was with confidence that I left the windows of the shop (where the paintings were drying) wide open while the family piled in the car to run a couple errands. (I also left our pop-up camper open in preparation for a camping trip, but that's a sad story for another day.)

Needless to say, while we were gone a freak thunderstorm came screaming into our town, and dumped about an inch of rain on us. Lucky for me, oil and water have a long, documented history of being natural foes, so all I had to do was mop up the rain that was sitting on my canvases with a towel and all was well. The beds in the camper were another story...

When we got back from our camping trip, (where we slept on nice, dry beds thanks to the aforementioned 105-degree heat...don't say it never did anything for ya!) I figured it was time to break out the stencil and attempt the most complicated portion of this project. I mixed some dark brown paint, and set the stencil on top of the rust-colored canvas.


Here is the canvas once I'd painted over the stencil:


And here is the final rust-colored canvas:


I am pleased with how it turned out! I was worried that due to the brush strokes from the background I would not get a clean line when I painted the stencil, but the special stencil paper did the trick. The only minor mishap I had was in transferring the stencil to the other canvases. I got a bit of excess paint smudges in various spots on the green canvas, but since it already had a rustic look with some brown streaks in it, I didn't care too much. I was more careful to wipe off the stencil on the final yellow canvas.


After letting the vines dry for a day or so, I went ahead and hung the paintings in the bedroom. For some reason, even though my husband has tools stashed in every corner of the shop and in the laundry room, there was absolutely no hammer to be found. So, in a move I felt was particularly cliched, I used the heel of my boot to pound in the nails. It was an improvisational way to finish a largely improvisational project.

Monday, July 12, 2010

First Birthday Cake

A few weeks ago I did a cake for my nephew's (Zach's sister's son) first birthday. It was a luau-themed party, so they had some cute ducks to add to the cake. I just had to provide the blue frosting and a border to match the ducks.

I have a new camera that I'm still getting used to, so the picture is not the best, but here it is:

The foil on my cake board is making a strange optical illusion on the photo. It doesn't really have a bunch of blue frosting underneath the yellow border on the bottom. I had fun with this cake - the extra blue tip #16 star on top of the yellow tip #21 stars made it just a little more polished than if I had left it with just the yellow stars (as I have in the past).

The school year is just a month away, so my cake making should ramp up again. I will probably make a cake for the first week of school to kick things off (and remind the staff about my availability to make cakes!).

I have a few non-cake projects on deck that I've been mulling for a few months now. The first is a set of paintings I've been wanting to do for our bedroom. The canvases are purchased and prepped, so now I just have to make some final decisions about color and create a vine stencil that I want to incorporate. Also, we just got back from a great vacation in Arizona and Utah, where we visited the Grand Canyon and Lake Powell. I got a few shots that I'd like to matte and frame, so that project will be coming up as well. I'll post photos of both as soon as they are complete!

Wednesday, June 2, 2010

Commissioned

My friend, Nicole (of cake class fame), has admired the paintings that I did for Drew and Kate, so I offered to make some for her boys' room. I had her pick out the ornaments and canvases, and I planned the designs.

I am pleased with how they turned out, and I hope Nicole and her boys like them, too! Here they are:


One of the pleasant side effects of parenthood is how your offspring can unexpectedly stoke your ego. While I was doing these paintings Drew and Kate were perched on either side of me. Drew looked at me and said, "Mom, you're an Artist!" What can I say, the kid is easily impressed.

Tuesday, May 11, 2010

An Unmitigated Disaster

My mom and I are big fans of the website "Cake Wrecks," which spotlights cakes that "go horribly, hilariously wrong." Up until now I haven't made any cakes that could take a spot of honor on that site. Until now.

Last week I was commissioned to make a cake for my husband to take to his school's career day. Luckily, this was a freebie -- no one was paying for it. All week long I thought about the cake I'd make, and I decided on a white cake with white frosting, strawberry jam in the middle, and a few strawberries on the top. I'd do some borders, but this was going to be a simple, elegant cake. Maybe something along the lines of this:


I should digress here to explain that at the Hobbs household we are very proud skinflints. Even though we live in Texas, we strive to keep our air conditioner off until the very last day possible. I'm perfectly comfortable to go with the windows open and ceiling fans on until it reaches about 82 in the house. At that point we reluctantly shut the windows, crank on the A/C (to 80 degrees), and await the electric bill. I failed to take any of this into account as I set off to bake the cake on Thursday afternoon.

For reasons that may or may not have had to do with the temperature, my from scratch white cakes were not the best. They did not come out of the pan easily and broke a smidge, but not so badly that I didn't think I could skillfully hide their deformity. So a lot was riding on that frosting!

Instead of my usual, go-to icing, I decided to experiment with one of my mom's very good fudge frostings. But instead of using regular, unsweetened chocolate, I decided to try white chocolate. Did I consult a recipe book, or maybe the internet, before I went about this substitution? No. No, I did not.

I had to use a full bag of powdered sugar to reach the consistency I was looking for, and this made the frosting taste like...sweet, sweet sugar. Not like white chocolate. But, that was all the powdered sugar I had, so no going back. I got my cakes on the platter, slathered some of the strawberry jam in between the layers, and set off to frost these hideous cakes.

It wasn't long before I realized there was a problem. The frosting was not sitting on the cake like usual. Instead, it was sliding around and melting off the sides, emphasizing exactly what I'd wanted to hide so badly! Just then it came to me: THIS HOUSE IS 81 DEGREES! I stopped what I was doing, slid the cake in the fridge, closed the windows, and cranked up the air conditioning (to an appalling 76 degrees!). Alas, it was too late. Here's what the cake looked like when it went into the fridge:


After a few minutes I brought out the cake to see what could be done. Maybe I could salvage it? Maybe the icing could be made to stay put? Nah....


As it often happens, once something starts going downhill, there's not much you can do to stop it. Before long, the jam started seeping out the sides, and my white cake became a pink monstrosity:


At this point I just had to laugh. How awful does that cake look!? There was absolutely no way to fix it. All I could do was take some pictures and do a humility check. Also: make alternate plans for a cake for Zach to take to work the next day.

The best part was when Zach got home that evening. The offending cake was in the fridge, and he stopped off there to get some water. I was busy with the kids, and a few minutes later I said, "Zach, I fixed the most awful cake today." "Oh, yeah," he said. "I wasn't sure if it was supposed to look like that or what, so I wasn't going to say anything..." Now there's a smart husband.

Post Script: The make up cake I decided on was a homemade "Sock it to Me Cake," which is basically a sour cream pound cake with streusel filling. It, too, was a disaster. It failed to come out of the pan and looked very, very ugly. Luckily, I had massive amounts of frosting left over from the first cake, so I just generously drizzled it all over the cake, successfully hiding its many flaws.

Friday, April 30, 2010

Non-Cake Creative Endeavors

Cake business has been slow lately, so I decided to finally get around to creating a few paintings for my daughter's room. Just last week she moved into a big bed from her crib, and redecoration was necessary. Now, according to my husband, that redecoration didn't need to consist of new paint on the walls, but he was overruled!

The idea for these paintings came a few years ago when I was decorating my son's room. I wanted to paint some simple cars and trucks on square canvases, but I wasn't confident in my ability to paint cars. While wandering around Hobby Lobby, I found the cutest wooden ornaments (for lack of a better term) - they had all kinds of cars, trucks, tractors, etc. All I had to do was paint the backgrounds, and glue the ornaments on to the canvas.

When I went back to Hobby Lobby for Kate's paintings, they didn't have many cute wooden ornaments anymore. But Michael's had a huge selection! I went through the same drill to pick out ornaments and plan the backgrounds to paint. I think they turned out really cute! Kate really likes the paintings, and won't quit standing up on her bed and pointing out the animals. "DOG! CAT! FWOG! FWAMIN" (unintelligible).

Here they are: